Setting color temperature and brightness of IKEA Tradfri lights simultaneously with Home Assistant
In my smart home I use multiple IKEA Tradfri lights in combination with a Conbee Zigbee hub and Home Assistant. Recently I encountered a problem when trying to set both the brightness and the color temperature in a Home Assistant service call (light.turn_on). Apparently, the Tradfri bulbs only respond to one of these values at a time. This is unfortunate as changing the temperature and brightness is usually linked. For example, setting the lights to a dimmed warm setting at night or bright white in the morning. Luckily, there is a workaround to be able to set both simultaneously (sort of at least).
The solution to setting brightness and color temp on Tradfri lights is to split the single service call in to two and let those blend. In my setup, I first set the brightness of the lights with a small transition and use a second call to change the color temperature with a longer transition. I have tested multiple setups and this method results in the smoothest transition. In essence my workaround performs three steps:
- Turn on the light with the target brightness.
- Delay for a second to make sure that the previous call has finished.
- Set the color temperature of the light with a short transition (5 seconds).
By putting these steps in to a script it can act as a drop-in replacement of a normal light call. If one of the settings was already set earlier, for example the brightness did not change, the transition is even smoother.
I have created two versions of this workaround, one for Home Assistant (YAML) and one for Node-RED, to help others that encounter this problem. It is not the most elegant solution but in practice it works pretty good!
Home Assistant script
To use the workaround in Home Assistant (yaml) add the following snippet to scripts.yaml:
turn_on_ikea_light:
  sequence:
    # Check whether the light is off (optional)
    - condition: template
      value_template: "{{ is_state(entity, 'off') }}"
    - delay: '00:00:01'
    # Set the brightness of the lights.
    - service: light.turn_on
      data_template:
        entity_id: "{{ entity }}"
        brightness_pct: "{{ brightness_pct }}"
        transition: 1
    - delay: '00:00:01'
    # Set the color temperature.
    - service: light.turn_on
      data_template:
        entity_id: "{{ entity }}"
        color_temp: "{{ color_temp }}"
        transition: 5
This block of code adds a new script turn_on_ikea_light that can be called inside automations. entity, brightness_pct and color_temp are variables that can be set when calling the script. An example is the following automation where a light is turned on when a motion sensor registers movement:
# Example automation using the script
automation:
  - alias: Turn on lights on movement
    trigger:
      - platform: state
        entity_id: sensor.motion_sensor
        to: 'on'
    action:
      service: script.turn_on_ikea_light
      data_template:
        # Variables that are passed on to the script:
        entity: light.some_light_entity
        brightness_pct: 80
        color_temp: 350
Node-RED script
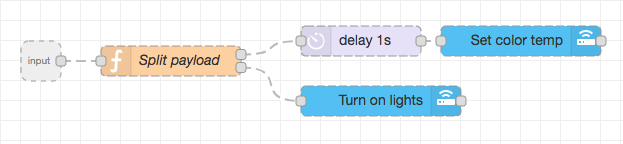
I’ve recently switched most of my automations to Node-RED so also rewrote my workaround. In Node-RED we need two service calls to HA (one for brightness and one for color temp). In the most simple case this can be done with two “call service” nodes and a delay node. To be able to reuse the flow this can be created as a subflow:
The subflow shown above expects a JSON message as the msg.payload. The payload is then split in to the two service calls. For example, to set the temperature of a light to 150 and the brightness to 100%, one could send the following payload:
{
    "entity_id": "light.some_light_entity",
    "color_temp": 150,
    "brightness_pct":100
}
The values can be hard coded in a change-node or can be dynamically set (for example based on the time of day).

The nodes of the subflow can be imported using the following snippet:
[{"id":"13593ff8.a6556","type":"api-call-service","z":"2dc416a2.d3b6fa","name":"Turn on lights","server":"161bb087.35566f","service_domain":"light","service":"turn_on","data":"{\"entity_id\":\"light.some_entity\",\"transition\":1}","render_data":false,"mergecontext":"","output_location":"payload","output_location_type":"msg","x":700,"y":480,"wires":[[]]},{"id":"7167f74f.dd6528","type":"api-call-service","z":"2dc416a2.d3b6fa","name":"Set color temp","server":"161bb087.35566f","service_domain":"light","service":"turn_on","data":"{\"transition\":5}","render_data":false,"mergecontext":"","output_location":"payload","output_location_type":"msg","x":840,"y":420,"wires":[[]]},{"id":"96a91d65.7a1a4","type":"delay","z":"2dc416a2.d3b6fa","name":"","pauseType":"delay","timeout":"1","timeoutUnits":"seconds","rate":"1","nbRateUnits":"1","rateUnits":"second","randomFirst":"1","randomLast":"5","randomUnits":"seconds","drop":false,"x":680,"y":420,"wires":[["7167f74f.dd6528"]]},{"id":"b76ccf31.5d0c","type":"function","z":"2dc416a2.d3b6fa","name":"Split payload","func":"br = {\n payload: {\n data: {\n entity_id: msg.payload.entity_id,\n brightness_pct: msg.payload.brightness_pct\n }\n }\n}\n\nwarmth = {\n payload: {\n data: {\n entity_id: msg.payload.entity_id,\n color_temp: msg.payload.color_temp\n }\n }\n}\n\nreturn [warmth, br]\n","outputs":2,"noerr":0,"x":490,"y":440,"wires":[["96a91d65.7a1a4"],["13593ff8.a6556"]]},{"id":"161bb087.35566f","type":"server","z":"","name":"Home Assistant"}]24 comments
Archived from the years this post accepted comments, 2019 to 2021. Commenting is closed; for questions or remarks, use the contact page.
Johannes Fornander
Thanks for sharing. I copied your Node-RED script with split payload. Where do insert the code for temp and brightness? Under each "call service" or under the "split payload"?

Wouter Bulten
Hi! The json message needs to be sent as the msg.payload. If you want it dynamic as in the example above (so that the splitting works), you will need to set it before you send the message to the subflow. It wil then be split inside the subflow and forwarded to the two service calls.
nicolas ganz
Thanks for this post - I am in the process of switching my 15 Tradfri bulbs to Hassio/Node red and was going crazy about the fact that i can only change one variable at a time! However i am completely new to node red an jso: I have imported you snipplet and set up an inject to with the given msg.payload. Upon importing it updatet the call service nodes to a new version that apparently handles entity_id differently. Now I dont get where i should specify the entity_id? Whatever i do the "call service" nodes in the subflow will just say "no connection".
nicolas ganz
[SOLVED]: Actually this workes out of the box. The entity_id needs to be specified just in the msg.payload (replacing the "light.some_light_entity"). What had the sub-flow failing was that when importing the snipplet it also created a new Home Assistant server with Woulters settings and was trying to send the call_service to that server instead of mine! I had to switch back to my own server in the two call_service nodes and now this is working like a charm! (No idea how to get rid of the "new server" however - since i desperately imported the snipplet about 10 times I now have the according number of servers in the list, all called "Home Assistant")
Wouter Bulten
Hi Nicolas, good to hear that you solved it! Good to know that this happend to you, maybe I can change the snippet to prevent this. You can remove old connection in the Node RED settings.
Bram
Wouter Bulten
Bram
mitswan
Wouter Bulten
Timo Reiß
Wouter Bulten
Timo Reiß
Wouter Bulten
Martin Bergman
Wouter Bulten
Ernst-Jan Kromhout
Wouter Bulten
Dpbe
Wouter Bulten
Shane
Wouter Bulten
F3rn4nd0 g3s3
Hi,
and how set for a ikea color bulg (004.086.12) ?
:-)
Thanks for your time and share!
Best regards
Fernando.
Wouter Bulten
Hi Fernando, you can use the same approach. Just replace color_temp with the color you want (for example rgb_color).