Room wake-up light: Custom room-wide wake-up light using Home Assistant
Table of contents
Recently I started using Home Assistant (HA) as a tool to control the lights in my home. My previous system was based on Homekit and, while working fairly good, lacked tools to further customize the automations. To get more control I switched to HA.
One of the first things I created using HA was a room wake-up light. I do own a Philips wake-up light but this doesn’t light up my whole room so that left room fore improvement. The automation I built using Home Assistant slowly lights my room every morning. The system works with any smart lamp that is compatible with HA, this includes Philips Hue] and IKEA Tradfri lamps. I use it with a few GU10 bulbs (like the Hue GU10 lights).
In this post I’ll show you how to build this system. The automation will be configurable (on/off, time) and has a switch to disable it on weekends.
More interested in Node-RED? Please read my post titled “Node-RED based custom full-room wake-up light”.
Example hardware
I’ve used the following components for my Wake-up light:
- Home Assistant running on a Raspberry 3B+
- Conbee Zigbee hub; there is a USB version and a PI version. (More info here)
- Three GU10 Zigbee smart lights. I use 3 Innr GU10 lights (not available in the US) but you could also use something like the lights from Philips Hue.
These components are just an example. A minimum requirement is a device that runs Home Assistant and a smart light that you can control.
My Home Automation hardware setupTime sensor
First step is to add a new sensor that measures time. This sensor will trigger the automation at the correct time. Add the following to sensors.yaml:
# sensors.yaml
- platform: time_date
  display_options:
    - 'time'
Make sure that this file is included in your configuration.yaml file, if not add the following:
# configuration.yaml
sensor: !include sensors.yaml
Create dashboard widget
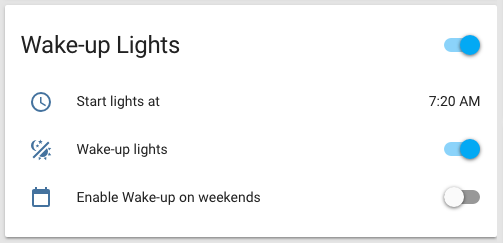
Next we build the dashboard widget. The widget consists of three controls: (1) a time input to control when the lights should go on, (2) an on/off switch and (3) a switch to enable the system on weekends.
We start with the two switches which are implemented as an input_boolean. Add the following to configuration.yaml:
# configuration.yaml
input_boolean :
  wakeup_enabled:
    name: "Wake-up lights"
    initial: on
    icon: mdi:theme-light-dark
  wakeup_weekend:
    name: "Enable Wake-up on weekends"
    initial: off # I disable the system on default on weekends
    icon: mdi:calendar-blank
The icons can be customized, see Material Design Icons for more options.
The third input controls the time of the wakeup light. For this we use input_datetime with the date component disabled as we are only interested in time.
# configuration.yaml
input_datetime:
  wakeup_time:
    name: "Start lights at"
    has_time: true
    has_date: false
    initial: "07:20"
To group the controls together in a single card on the dasboard we need to make a new group. Add the following to the groups.yaml file. Again make sure that this file is included in configuration.yaml.
# groups.yaml
alarm_clock:
  name: "Wake-up Lights"
  entities: # Add all entities here that should be part of the widget
    - input_datetime.wakeup_time
    - input_boolean.wakeup_enabled
    - input_boolean.wakeup_weekend
Note: As someone pointed out in the comments, if you want to persist the values between restarts of Home Assistant remove the ‘initial’ value from the configuration.
Create the automation
With all controls defined we can make the automation itself. The automation consists of three components: the trigger, the condition and the action. Add the following to automations.yaml:
# automations.yaml
- alias: "Wake-me up using bedroom lights"
  trigger:
    # Something that triggers the automation
  condition:
    # A list of conditions that need to be met
  action:
    # The action we want to perform.
The trigger is based on the time sensor we just created. It gets the state of the sensor and checks whether this value matches the value of our datetime input.
trigger:
  platform: template
  value_template: "{{ states('sensor.time') == (states.input_datetime.wakeup_time.attributes.timestamp | int | timestamp_custom('%H:%M', False)) }}"
The trigger we defined above will fire regardless of the on/off switches. To include the switches in the automation we have to create a list of conditions. The first condition checks whether the wake-up light is enabled, if not the automation is not executed at all. Then we add an or condition that checks whether it is a weekday (a condition on time) or that the weekend switch is enabled. Only one of the or conditions has to be met.
condition:
  - condition: state
    entity_id: input_boolean.wakeup_enabled
    state: 'on'
  - condition: or # One of the conditions below must be true
    conditions:
      - condition: state # Will be true when the switch is 'on'
        entity_id: input_boolean.wakeup_weekend
        state: 'on'
      - condition: time # Will be true on weekdays
        weekday:
          - mon
          - tue
          - wed
          - thu
          - fri
Last we define what to do when all conditions are met. In my case I slowly fade in all the lights in the group.bedroom group. You can add your own lights here.
action:
  - service: light.turn_on
    entity_id: group.bedroom # Put the entity of your light or your group here
    data:
      transition: 600 # Transition time in seconds
      brightness: 255
The full automation with everything filled in, this should be placed in automations.yaml.
# automations.yaml
- alias: "Wake me up with bedroom light transition for weekdays"
  trigger:
    platform: template
    value_template: "{{ states('sensor.time') == (states.input_datetime.wakeup_time.attributes.timestamp | int | timestamp_custom('%H:%M', False)) }}"
  condition:
    - condition: state
      entity_id: input_boolean.wakeup_enabled
      state: 'on'
    - condition: or
      conditions:
        - condition: state
          entity_id: input_boolean.wakeup_weekend
          state: 'on'
        - condition: time
          weekday:
            - mon
            - tue
            - wed
            - thu
            - fri
  action:
    - service: light.turn_on
      entity_id: group.bedroom
      data:
        transition: 600
        brightness: 255
Enable the automation
With everything filled in restart HA. The widget should be available on your dashboard. From there you can enable the widget and set a custom time. Your lights should now go on at the defined time.
31 comments
Archived from the years this post accepted comments, 2018 to 2022. Commenting is closed; for questions or remarks, use the contact page.
asdf
Remove all three "initial: ...." fields if you want the settings to be saved between restarts

Wouter Bulten
Good tip, I will add it to the post!
Caitlin T
Hi, do you know if there's a way to make the wake up light start at the reddest colour and gradually change to a whiter colour while it's also turning the brightness up?
Wouter Bulten
Hi Caitlin, I think you can just add the color_temp to the "turn_on" call. It depends on the lights whether this is supported. The Ikea Tradfri lights don't for example (see https://www.wouterbulten.nl.... For those case you could write a small script that loops and sends a command every minute or so.
Caitlin T
Yeah I have the Tradfri lights. I don't know anything about writing scripts, but I'll check out your link and see if it helps.
quantummobile
Hi Wouter,
thanks for great automation - works perfectly with Ikea Tradfri E28 bulbs.
Would be very convenient to have transition time and brightness configurable in a widget as well.
Wouter Bulten
Thanks! You could use data_template in combination with an additional input to build that. Would be a nice addition indeed!
quantummobile
Hi,
maybe you could help with the code? :) I am very bad in code writing.
Thank you in advance!
Dmitry
Hi Wouter,
How I can add widget group to lovelace properly?
I adding it like this
type: entities
entities:
- entity: group.alarm_clock
Wouter Bulten
Hi Dmitry, I will have to update the post. For now you can edit it through the manual mode of Lovelace. I don't have a lovelace config (yet). If you have one and are willing to share I would happily ad it to the post :)
fshkypr
thank you for sharing. unfortunately i'm having some issues getting this to work properly. im using Teckin SB50v3 light bulb flashed with Tasmota. i can trigger the light on with the automation.. but it wont run when i set the alarm. any idea how i could get this to work. thanks
Wouter Bulten
Hi. It should work regardless of which light you use, as long at is controllable through Home Assistant. Based on your information, it's hard to determine where it goes wrong. Does the automation trigger at the right time?
Wout
Hi, thanks for sharing this. Unfortunately, I’m still a noob in this...how do I integrate this with Lovelace? A very big thank you!
Wouter Bulten
Hi Wout. To add to your lovelace view, just make a new card with the following entities:
input_datetime.wakeup_time
input_boolean.wakeup_enabled
input_boolean.wakeup_weekend
Tom
Wouter Bulten
Hille
Wouter Bulten
Hein
Wouter Bulten
Max
Wouter Bulten
Gary
Hi Wouter,
Checked your automation and is looking great.
However, using Ikea's Tradfri, it sadly seems not to work.
Is this automation stille working for you and any idea how I could troubleshoot please?
Wouter Bulten
Hi Gary, what kind of problems do you encounter with your Tradfri lights? One thing to consider is that you can't set brightness and color_temp on Ikea lights in a single call.
Gary
Thanks for replying. No, I'm not using the brightness neither the color temp. I did use your automation and set it up as described. However, the lights ain't doing anything. Tried troubleshooting but they just don't seem to react. I first try with the group, also tried with one of the two lights but they seem not to like turning on. In the Ikea app, you can use them and that works but I'd like to use the HA without all the seperate apps.
Any idea?
Wouter Bulten
Hi Gary, can you turn on the lights using the HA dashboard? Also check your logs, maybe there is a small error and the logs usually give an indication where. Let me know if you have more info!
Gary
Hi,
I did check the logs before I contacted you... nothing.
The same lights are controled by HA and even by a xiaomi sensor when detecting movement.
Gary
Fredrik Lysen
Hi Gary,
You probably need to create a custom script for IKEA trådfri that does the colour brightness change in two or more steps with a sleep between the changes. IKEA trådfri can't take multiple changes in one command.
Wouter Bulten
Good suggestion! Not sure whether Gary is using brightness and color temp.
One other thing to consider: I have seen some reports that IKEA lights are unresponsive during a transition. So take in to account that you possibly can't send a new command to the lights when they are still performing the transition.
Markus
Hi,
thank you very much for the detailed article, found exactly the solution i was trying to implement. ;-)
Just to bring topics together - i found this article regarding "Light Fade In" in the HA forums, which follows another aproach - for example useful for the Tradfri Lights? - https://community.home-assi...
I'm using Tradfri lights in two kids rooms, at the moment the automation is triggered correctly, but the lights will turn on immediately to the given brightness, the transition seems to be ignored. I'll try Frederiks solution via script tonight, thanks again!!
Wouter Bulten
Hi Markus, thanks for the suggestion! I'm glad the article helped. I've done something similar now for my implementation in Node-RED: I increase the brightness manually every minute instead of using a long transition. For some lights (like Tradfri) this seems to be more stable.
Good luck with your implementation!